Web Real-Time Communication is an API, by the use of which, we can communicate with browser to browser or mobile application in real time.
Before i begin, let me tell you — implementing WebRTC is easier than you think. Here, we will learn how it works and its implementation.
When I emphasized exchanging data in real time, it means data transferred during live video, audio calls, twitch/youtube stream, and even chat messages. Latency must be very very small for those kind of services and thus, this is where WebRTC shines.
You can imagine it as “two cup phones”

As there lies two cup connected with a rope, WebRTC also connects between two user. And while it’s often shown as a one-to-one setup, it can also handle multi-user connections.
Okay, let me touch surface first.
There is something called offer and answer . Offer is the one starting the connection and answer responds to the request of connection establishment by offerer.
If Cup 1 is a offerer then Cup 2 has to answer. Choose your own Cup.
To offer, you have to have something right? Yes, that something is called SDP — they will exchange SDP(Session Description Protocol) with each other.
Alright that was just a warm-up, now Lets start from beginning.
Let us assume client A wants to communicate with client B. So client A will initiate the connection and client B will responds to it.
*Send Offer
For client A
/// CLIENT A ///

let pc = new RTCPeerConnection();

let offer = await pc.createOffer();
await pc.setLocalDescription(offer);

// send a offer sdp somehow
sendToClientB({type:"offer", offer: offer.sdp});
here, new RTCPeerConnection() creates a instance of connection which is stored in pc variable. pc.createOffer() creates an offer that has its own SDP which is also stored locally as await pc.setLocalDescription(offer) and SDP is sent to another client through HTTP protocol or any medium that you think is of suitable.
SDP(Session Description Protocol)
It is a plain text format that describe the multimedia session: what media types(audio, video, text), codecs, encryption, transport parameters(ICE, etc.). We will talk more about ICE later.
*Receive offer and Send Answer
This is for client B
/// CLIENT B ///

// get the offer SDP somehow
let offer = getFromClientA();

const pcB = new RTCPeerConnection();
const offer_sdp = new RTCSessionDescription(offer);
await pcB.setRemoteDescription(offer_sdp);

const answer = await pcB.createAnswer();
await pcB.setLocalDescription(answer);

// send back to client A either through http or websocket or any other medium
sendToClientA({type:"answer", offer: answer.sdp});
Here, let offer = getFromClientA() it is to show that you have to receive an offer sent by a client A.
You take that offer, creates a new connection, set the offer through RTCSessionDescription, set the offer in remote Description, create answer, set the answer in local description and send that answer finally back to the client A. Its not quite different than what we did for Client A.
The answer we created by ourselves is set in local description. and the offer we get from other side is stored in remote description.
Here,new RTCSessionDescription(offer) ensures that offer is not just JSON and tells a webRTC engine that it is a right session description.
Now Client A also has to process the answer.
*Receive Answer
// get the answer sdp somehow
let answer = getFromClientB();

pc.setRemoteDescription(new RTCSessionDescription(answer));
So in a nutshell,
- Client A sets a offer to localDescription and sends a SDP which is in the offer to a Client B
- Client B receives a offer and set it inside the RemoteDescription.
- Client B sets a answer to localDescription and sends a SDP to Client A.
- Client A receives a answer and set it inside the RemoteDescription.
Thats it, are we done? No!
After the exchange of SDP, both the client knows what to expect from each other. Like, audio, video, codecs etc.
But they still don’t know how to reach to each other in the network.
Remember, they do not rely on intermediary, so they somehow have to find each other in network.
That’s were ICE comes in.
ICE (Interactive Connectivity Establishment)
Its a framework to allow your browser to connect with peers. Straight up connection will not work because it need to bypass firewall, gives you unique IP address, relay data through server if your WiFi don’t allow you to directly connect to peers. ICE uses STUN and TURN servers to achieve this.
Kudos to MDN for making such a cool docs.
Each peer discovers all possible ways to reach the other:
- Local IPs (LAN addresses)
- Public IP via STUN server
- Relayed addresses via TURN server (if NAT blocks direct connection)
You may wonder, how does those two client which could be located anywhere around the globe has idea about each other at the first place to even connect? How would they know each other?
What did we exchanged earlier? 🥁 🥁 🥁 SDP!!!
Yes, SDP contains network related information with ICE candidates.
Each discovered address is called a candidate, and it’s sent to the other peer through your signaling channel.
Oh wait, whats signaling channel?
Its any sort of channel to exchange the information before starting the connection. WebRTC alone cannot start the connection. Its need some kind of channel to establish connection. It can be either email, postcard, http protocol, websocket etc.
The information we need to exchange is the Offer and Answer which just contains the SDP.
Ahhh, now you got clicked. Yeah we already did that earlier when sending sdp between client A and client B.
STUN
Session Traversal Utilities for NAT(STUN)
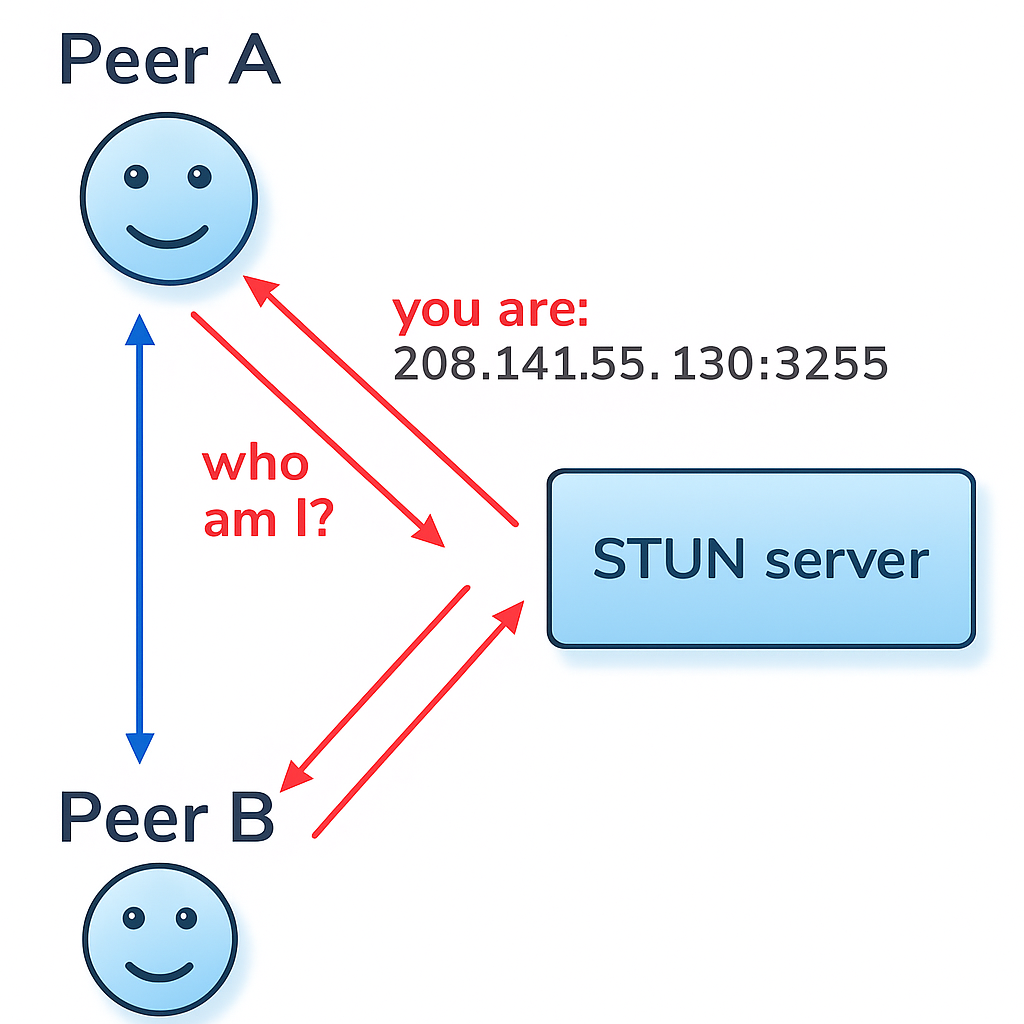
STUN is a server which gives client public address and whether or not client is accessible behind router’s NAT.
from browser’s perspective its tells:
“Hey, from the internet’s perspective, you look like you’re coming from 208.141.55.130:3255”
NAT
Some routers/firewalls have symmetric NAT or strict filtering — they only accept packets from addresses you contacted first.
So even if peer B knows your public IP and port from STUN, their packets still get dropped.
This is when direct peer-to-peer fails.
So, we need a TURN server.
TURN
Traversal Using Relays around NAT (TURN)
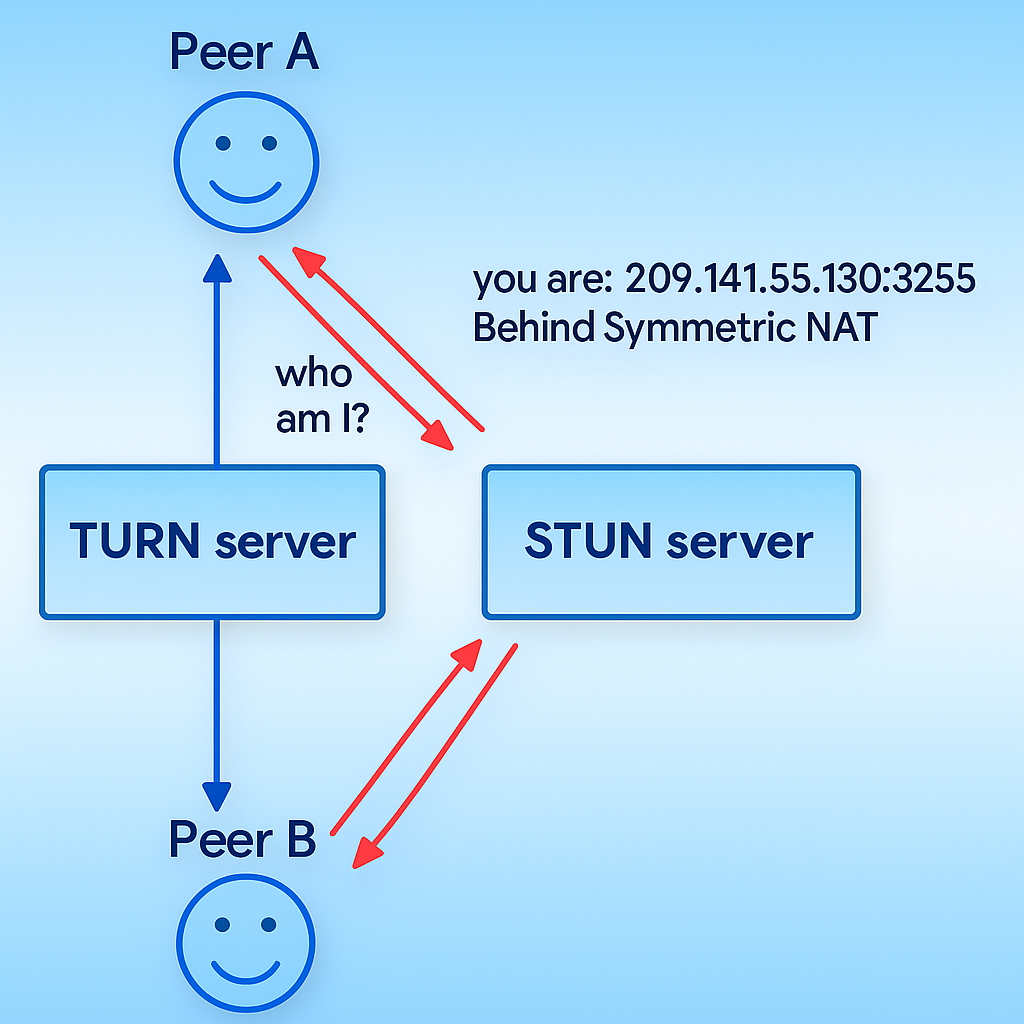
TURN bypass such NAT by opening the connection with TURN server and relaying all info through that server. All the packets between clients will be forwarded through TURN server, here comes the intermediary.
To see the logs of ICE state change
pc.onconnectionstatechange = () => {
  console.log("Connection state:", pc.connectionState);
};
Okay now let me give code example.
Example
Before i begin, look at the source code to understand: https://github.com/sauhardh/cam_era
After that, you can read the following text alongside the code for much better understanding.
We are creating a camera app.
Here, we will open a camera in client A and share it to the another client B and same client B will re-share that to us back so that we see what our camera is capturing.
Client A
This is the first step of initializing the connection.
< !--Complete html by yourself-- >
< html >
        < audio id="localAudio" src="" > < / audio >
        < video id="localVideo" class="videobox" playsinline controls="false" / >
< /html >
/// CLIENT A ///

// In config you can set STUN and TURN server.
function InitializePC(){
    let config = {
        sdpSemantics: 'unified-plan',
        iceServers: [{ urls: "stun:stun.l.google.com:19302" }]
    };
    let pc = new RTCPeerConnection(config);
};
Data channel(optional).
Imagine it as a secret passage or pipe between two clients. You can pass a extra data, metadata through data channel.
It doesn’t affect the flow of real track(either audio, video or both) that passes through WebRTC.
Types of data that usually passed through is metadata of the track, text chats, etc.
function InitializeDC(){
     dc = pc.createDataChannel("chat");
      // This will print when there is message on data channel named "chat"
     dc.onmessage = (e) => {
        console.log("Data", e.data);
     };
};
Media Device
// Make sure you have html elements that support video and audio
const videoPlayer = document.getElementById("localVideo");
const audioPlayer = document.getElementById("localAudio");
Now listens to the track coming from the pc (i.e. peer connection instance) and displays through the video and audio HTML elements in the frontend.
// displays track in the frontend whenever it is available from another client
    pc.addEventListener("track", (e) => {
        if (e.track.kind == "video")
            videoPlayer.srcObject = e.streams[0];
        else
            audioPlayer.srcObject = e.streams[0];
    });
Now, this part gets the permission from the user to allow browser to use your camera and audio devices, so that it gets those data to transfer.
In above code, we were listening for the track from another client (client B).
Here, we are listening the track from our own device’s camera and audio and added that track into the WebRTC so that it is sent to the client we want (Client B).
After client(Client B) receive our track, it will send us back (according to our original plan, we have yet to code the Client B).
let constriants = {
        audio: true,
        video: true
    }

// navigator is a webAPI, available in browser
// mediaDevices provides functionality for your web-browser to use your camera and microphone
    let localstream = await navigator.mediaDevices.getUserMedia(constriants)
    localstream.getTracks().forEach(track => {
// localstream is the stream of data, track is the metadata of track
        pc.addTrack(track, localstream); // adding track into webrtc instance--pc
});Overall,
async function ManageTrack() {
  const videoPlayer = document.getElementById("localVideo");
  const audioPlayer = document.getElementById("localAudio");

  pc.addEventListener("track", (e) => {
    if (e.track.kind == "video" && videoPlayer)
      videoPlayer.srcObject = e.streams[0];
    else audioPlayer.srcObject = e.streams[0];
  });

  let constraints = {
    audio: true,
    video: true,
  };

  let localstream = await navigator.mediaDevices.getUserMedia(constraints);
  localstream.getTracks().forEach((track) => {
    pc.addTrack(track, localstream); // adding track into webrtc instance--pc
  });
};
Negotiation
This is the part to initiate the process i.e. sending offer, receiving answer to establish connection.
Earlier, we are just listening to the event but we had not initialize the connection with another client. And for your reference, event listener will continuously listen for the event they are assigned to, so after connection is established and then the event is triggered, it will perform its function.
//
// Negotation
//
const fn_negotiate = async (pc) => {

    let offer = await pc.createOffer();
    await pc.setLocalDescription(offer);

// Wait till ICE gathering is complete
    await new Promise(resolve => {
        if (pc.iceGatheringState == "complete") {
            resolve();
        } else {
            pc.addEventListener("icegatheringstatechange", checkICEState = () => {
                if (pc.iceGatheringState == "complete") {
                    pc.removeEventListener("icegatheringstatechange", checkICEState);
                    resolve();
                }
            });
        }
    });

    let localoffer = pc.localDescription;
    //OFFER : Sending POST request to the server endpoint with offer.
    let response = await fetch("/offer", {
        method: "POST",
        headers: {
            'Content-Type': "application/json",
        },
        body: JSON.stringify({
            type: localoffer.type,
            sdp: localoffer.sdp
        }),
    })
    if (response.statusText != "OK") {
        console.log("Server didnot respond")
        return;
    }
    //ANSWER : Getting answer of offer from the server.
    let answer = await response.json();
    await pc.setRemoteDescription(answer);
}
Now lets start all those function.
start_button is a button on html.
async function Start() {
  pc_setup();
  dc_channel();
  await track();
  await fn_negotiate(pc);
}

const start_button = document.querySelector(".start-button");
if (start_button)start_button.addEventListener("click", Start);
We have completed the Client A.
It is more like a frontend which captures the camera and audio from your device and send it to client B.
Now Client B has not much of the work expect accepting the offer and replying the same thing back to you.
Client B
So, Client B has to accept the offer sent by Client A through HTTP protocol, since Client A is sending its offer in the POST request.
Lets make a server which does that job for us.
I will write Client B in python as there is a package i.e. aiortc available which makes our job easier.
POST request on /offer endpoint is processed in offer function
app.router.add_post("/offer", offer)
async def offer(request):
    params = await request.json()
    offer = RTCSessionDescription(sdp=params["sdp"], type=params["type"])

    pc = RTCPeerConnection()

    @pc.on("track")
    def on_track(track):
        pc.addTrack((track))

    @pc.on("datachannel")
    async def on_datachannel(channel):
        @channel.on("message")
        async def on_message(message):
            message = json.loads(message)["message"]
            length = len(message)
            words = len(message.split(" ")) if " " in message else 1
            channel.send(
                json.dumps(
                    {
                        "message": message,
                        "length": length,
                        "words": words,
                    }
                )
            )

    await pc.setRemoteDescription(offer)
    answer = await pc.createAnswer()
    await pc.setLocalDescription(answer)

    # Sending answer to the server
    return web.Response(
        content_type="application/json",
        text=json.dumps(
            {"sdp": pc.localDescription.sdp, "type": pc.localDescription.type}
        ),
    )
It receives an SDP offer from the request and initializes a new RTCPeerConnection.
If a media track is received, it’s added to the connection.
If a data channel is opened, the server listens for messages and replies with a JSON object containing the original message, its length, and word count.
Finally, it sets the remote description, creates an SDP answer, sets it as the local description, and returns the SDP answer in the response — completing the WebRTC handshake
That’s only to get the connection established. But for fully workable example here it is,
import pathlib
import json
import logging

from aiohttp import web
from aiortc import RTCSessionDescription, RTCPeerConnection

BASE_DIR = pathlib.Path(__file__).parent
STATIC_DIR = BASE_DIR / "static"
HTML = BASE_DIR / "index.html"
logger = logging.getLogger(__name__)


async def index(request):
    contents = open(HTML, "r").read()
    return web.Response(content_type="text/html", text=contents)


async def offer(request):
    params = await request.json()
    offer = RTCSessionDescription(sdp=params["sdp"], type=params["type"])

    pc = RTCPeerConnection()

    @pc.on("track")
    def on_track(track):
        pc.addTrack((track))

    @pc.on("datachannel")
    async def on_datachannel(channel):
        @channel.on("message")
        async def on_message(message):
            message = json.loads(message)["message"]
            length = len(message)
            words = len(message.split(" ")) if " " in message else 1
            channel.send(
                json.dumps(
                    {
                        "message": message,
                        "length": length,
                        "words": words,
                    }
                )
            )

    await pc.setRemoteDescription(offer)
    answer = await pc.createAnswer()
    await pc.setLocalDescription(answer)

    # Sending answer to the server
    return web.Response(
        content_type="application/json",
        text=json.dumps(
            {"sdp": pc.localDescription.sdp, "type": pc.localDescription.type}
        ),
    )


app = web.Application()
app.router.add_get("/", index)
app.router.add_static("/static", STATIC_DIR)
app.router.add_post("/offer", offer)
web.run_app(app)
I will not explain this as it is now a self explanatory.
Let me know if you have any doubt on this and visit the source code for better understanding.
Happy hacking.