Master OAuth 2.0 in Next.js: Scopes, Tokens, and TypeScript Fixes
OAuth stands for Open Authorization — an authorization framework which enables a third-party application to obtain limited access on behalf of resource owner through authorization server.

Background
OAuth 2.0 is a de-facto industrial standard replacing Oauth 1.0 used for authorization.
Not to get confused by, its an authorization protocol, not an authentication. Here user’s credential is not shared, Instead access token is used to access the resource. We will talk about that in detail shortly.
Though widely used in client side website, It can also be used in native/mobile apps, connected apps, server side web app and browser based app.
Alright, lets go more deeper.
OAuth Roles
OAuth has four roles: Resource Owner, Authorization Server, Resource Server and Client.
Lets say you are trying to login into some sort of website, let it be x.com .
And let us assume again that you are trying to log into x.com with the help of github.com. When we are signing in we see “login with google” options right? That’s where OAuth comes in.
- Client
client is a x.com who is trying to access your’s github data. - Resource Owner
resource owner is “you” who owns the data on github. - Authorization Server
authorization server is the github OAuth authorization server. It Authenticates the user(ask them to log in)
Get the user’s consent (“Allow a x.com to access your data?”)
Issue a access token to x.com - Resource Server
Github API server that hosts the actual resources. It verfies the access token that x.com will send after receiving from auth server. Upon verification, it returns the requested data.
Usually, access is read only.
The access token that we were talking is usually an random that represent an authorization to access data. But it can also be structured like a JWT, which carry encoded data.
Abstract Protocol Flow
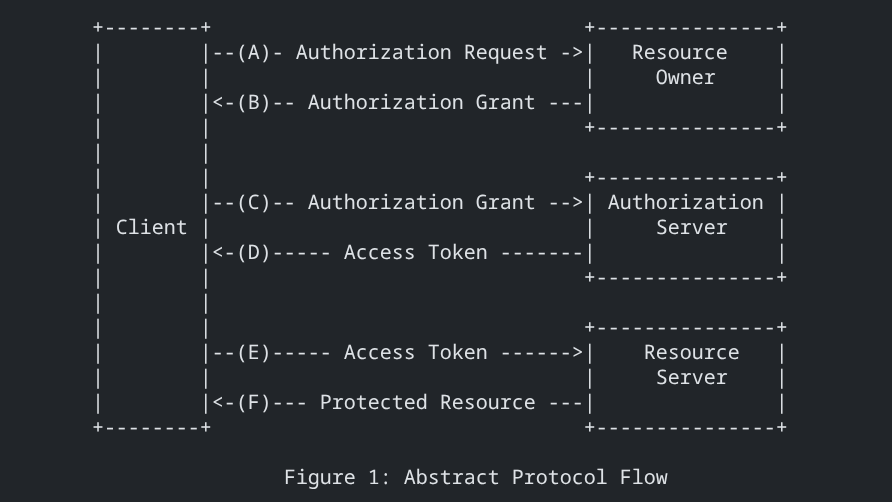
Okay Now lets talk about the flow of the abstract protocol flow.
- A) Authorization Request
Client redirects the user(you) to github authorization page. Example Url: https://github.com/login/oauth/authorize?client_id=...&redirect_uri=... - B) Authorization Grant
After user logs in and approves, Github sends back an authorization code back to your app(x.com). - C) Authorization Grant
x.com(Client) now sends a authorization code to Github authorization server. - D) Access Token
The Authorization Server validates the authorization code and returns an Access Token. - E) Access Token
Now x.com(client) sends that access token to the resource server - D) Protected Resource
Resource server sends a data requested by x.com(client) upon validation of that access token
There is also an scopes of the data that we allow a client to access from protocted resources. And a redirect URI — where a authorization server redirect a user after user has either given access or denied.
Okay, enough talking. Lets see an example.
NextAuth
Well, NextAuth is an authentication solution for NextJS.
Although we talked a bit in-depth about OAuth earlier, NextAuth is relatively simple since it provides an abstract and easy way to implement OAuth.
I don’t want to give you every guide on how to get started. Its already available on NextAuth Official website. (I would suggest you to first follow that tutorial and come here if you are new.)
However i would love to give you an insights on how you can improve your game. Like,
- How to give an scope?
- Want to get an access-token of user?
- Did typescript throw an error — that you cannot extend your session data or token data?
- There is also an token data, what does it provides?
Well lets explore.
The following example I will be giving to you is written in typescript/NextJS and github as service provider.
How to give scope
GithubProvider({
 clientId: process.env.GITHUB_ID as string,
 clientSecret: process.env.GITHUB_SECRET as string,

 authorization: {
 params: { scope: "read:user repo" }
 }
});
As you can see above in the example, This is one of provider that we place in array of Providers .
In the docs, Providers are configured in this page: pages/api/auth/[…nextAuth].js . This path can can also be written as app/api/auth/[…nextAuth]/route.ts , The difference is that one uses page router and other uses app router. Also, […nexAuth] can be written as a file or a folder regardless of routing style.
Usually scope is set to default and in most case we don’t have to change it. However, Here we’ve set the scope to "read:user repo” so the app can access the user’s profile and private repositories. To get user’s email you can insert user:email like "read:user user:email repo" .
Incase of some other providers, you can visit their own website.
How to get an access-token of a user
export const authOptions = {
  // Configure one or more authentication providers
  providers: [
    GithubProvider({
      clientId: process.env.GITHUB_ID,
      clientSecret: process.env.GITHUB_SECRET,
    }),
    // ...add more providers here
  ],
}
This ☝️ is the snippet I borrowed from the official documentation.
export const authOptions = {
  // Configure one or more authentication providers
  providers: [
    GithubProvider({
      clientId: process.env.GITHUB_ID,
      clientSecret: process.env.GITHUB_SECRET,
    }),

    callbacks: {
        async jwt({ token, account, profile }) {
            if (account && profile) {
                token.username = profile.login;
                token.access_token = account.access_token;
            }
            return token;
        },

        async session({ session, token }) {
            session.user.username = token.username!;
            session.user.id = token.sub!;
            return session;
        }
    }  ],
}
We now have added a callbacks object.
here, jwt() function has a parameter of token, account, profile.
This account and profile is initialized only during initial login of the user.
While session() is initialized when user starts its session i.e. when user open the app.
In jwt(), token, account, profile gives information like
Token: {
name: 'name',
email: 'email',
picture: 'https://avatars.githubusercontent.com/u/id?v=4',
sub: 'id'
}

Account: {
  provider: 'github',
  type: 'oauth',
  providerAccountId: 'id',
  access_token: 'gh**********Z',
  token_type: 'bearer',
  scope: 'read:user,repo'
}

Prfile:  {
  login: 'username',
  id: 'id',
  node_id: '<...>',
  avatar_url: 'https://avatars.githubusercontent.com/u/id?v=4',
  gravatar_id: '',
  url: 'https://api.github.com/users/username',
  html_url: 'https://github.com/username',
  followers_url: 'https://api.github.com/users/username/followers',
  ...,
  ...,
  ...,
}
Here inside jwt({account, profile, token}) function, i have attach “username” and “access_token” inside the token object.
and later in session({session, token}) function I would have access to those username and access_token from the token object available in parameter.
NOTE: Do not put access_token inside session object. Session object is exposed to client side(browser). That would be a major security risk.
Always access those token object only on server side of NextJS.
Persuade TypeScript to allow inserting new fields inside the object
In above jwt() callback, we attach the access_token and username to token object so they persist between request.
Then, in session() callback, we included the id and username inside the session’s userobject making them available to the client side.
Though you can easily add new fields inside objects in JavaScript, TypeScript is little hesitant to do so.
Now, make a new folder types inside src or one level outside app .
Also make a new file named types/next-auth.d.ts .
import NextAuth from "next-auth";

declare module "next-auth" {
    interface Session {
        user: {
            name?: string | null;
            username: string;
            email?: string | null;
            image?: string | null;
            id: string;
        };
    }
}

declare module "next-auth/jwt" {
    interface JWT {
        username?: string | null;
        access_token?: string;
    }
}
Write this inside the file you just created.
Here we are extending the fields inside objects in the modules “next-auth” and “next-auth/jwt”. Now, typescript will not complain when we add new fields like username and id inside the user object and username and access_token inside token object. Here, token is of type JWT .
NextAuth has truly made implementing OAuth much easier.
I Hope these texts have cleared your doubts and given you some useful insights.
Happy hacking! 👋